The endgame in chess

The end game is the last phase of a chess game. This part of the game is characterized by a relatively small number of pieces on the chess board.

The end game is the most analyzed part of the game. There is a huge volume of information about it, many chess books focusing specifically on this part of the game. The reason for this is that in end games certain patterns in positions appear to repeat themselves during games. That means that, because there are relatively few pieces on the board, a particular position may appear more than once in your games.

Many beginners make the mistake of overlooking this part of the game as they believe it to lack any spontaneities. They believe that this phase of the game is only about calculating the possible moves. That is not true. Although it involves the cold, mathematical like, analysis of the game, the end game can also contain amazing tactical procedures and combinations. If you don't believe me just look at the grandmasters : they all exceed at this part of the game.

Another argument in favor of studying more careful the end game is that in this part of the game, supposing you know how to play it, you could take benefit of even the smallest advantage you gained during the opening and middle game. Of course ,if you have a disadvantage you can sometimes end the game as a draw.

For example if you reach to a point where on the chess board there are only your two bishops your king and your opponent's king do you think you can checkmate his king? If you are familiar with this kind of an end game you probably will. But if you aren't I'm almost sure that you won't be able to checkmate. And this is just a basic example of a chess end game. There are countless more end games that you need to know in order to really know how to play chess.

This site has only a few basic end game examples for now. If you are really serious about wanting to learn the game I suggest you look for a good book that necessarily must contain more end games studies.

The square rule

This trick will help you to determine wether a king can catch a pawn before it can be promoted. Of course you can calculate this on your own but the method you'll see here will allow you to figure it out much faster ( shortages of time are quite frequent in this part of the game).

The square rule is nothing more than visualizing a square as shown in the image. The side of the square is made by the square on which the pawn is and the remaining squares to the promotion square. If the opposing king manages to enter the square then it will be able to catch that pawn just before it gets promoted and capture it. As you can see in the example the black king is not in the white pawn's square. But if it's Black's turn to move the king will enter the square and will eventually catch the pawn. However if it's White's turn to move the black king won't be able to reach the pawn in time.


Look at the following example. 

When establishing the square you should keep in mind that from the initial position the pawn can move two squares... so pay attention!


What is opposition

The term of opposition refers to the position of the two kings placed one in front of the other separated by a square.


Obtaining opposition is very important in pawns endings and in many cases is decisive.

Look at the following game. 

    Opposition
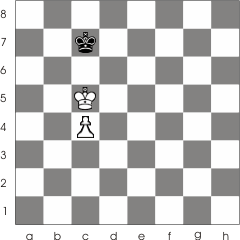
The two kings are in opposition. The king who has to leave opposition will loose. 

1... Kc7-d7 2. Kc5-b6 Kd7-c8 and with 3. Kb6-c6! the White wins the opposition again. Now we have the same situation as earlier : the black king has to leave the opposition :

3... Kc8-b8 (or Kc1-d1) 4. Kc6-d7and now the white king has the promotion square under control. 4...Kb8-b7 5. c4-c5 Kb7-b8 6. c5-c6Kb8-a7 7. c6-c7 Ka7-b6 8. c7-c8


and now White has promoted the pawn into a queen.The black king will inevitable be checkmated.


Now let's take a look to the original position. If the white king has to leave the opposition 1. Kc5-b5 then the black king will maintain the opposition by 1 ... Kc7-b7 2. c4-c5 Kb7-c7 3. c5-c6 Kc7-c8 4.Kb5-b6 Kc8-b8 and the game ends a draw; White has to give up its pawn or there will be a stalemate situation. 


Zugzwang

Zugzwang is a situation that takes place when a player that has his turn to move is forced to make that move even if it will cause him a disadvantage. There are times when you can play in such a manner that you can bring your opponent in a zugzwang situation.

What would happen if we were to add to the example from the previous article those pawns in the right? The absolute beginner could say that the position is equal because both sides have an equal number of pawns. That is far from truth. Notes that Black isn't able to move his pawn from h7 because the white pawn from g5 will immediately capture it (either by en passant if 1... h7-h5 or just a regular capture if 1... h7-h6).

In fact White will win regardless of who moves first. If Black were to move first then he would loose the opposition and we would have the same situation from opposition. If White will make the first move then he will bring Black in a zugzwang position.

Zugzwang
White wins by bringing Black in a zugzwang position. This is the same example from the opposition article with a few pawns added1. Kc5-d5 Kc7-d7 2. c4-c5 Kd7-c7 3. c5-c6 Kc7-c8 4. Kd5-d6 Kc8-d8 5. c6-c7+Kd8-c8 6. Kd6-c6 And voila the Black is official in a zugzwang position. If it wasn't the pawn at h7 then this would have been stalemate.But, that is not the case. White has intentionally lead the game to a zugzwang position for Back. Now Black is forced to move its free pawn.
Black is now in a zugzwang position. The black king is stucked at c8 and thus Black has to move his pawn.6... h7-h6 7. g5:h6 ( Or 6... h7-h57.g5:h6(by enpassant) ) 7... g6-g58. h6-h7 g5-g4 9. h7-h8checkmate The pawn is promoted into a rook and it's checkmate for the black king ; White wins.The final position on the chess board. Black is now checkmated


One queen checkmate

In order to checkmate the opposing king the queen needs the support of its own king.

There is a certain plan you should follow when mating in simple positions. The plan is to gradually reduce the opponent's king free space. In our case you have to limit the king's movement on a line on the edge of the board. The queen will do this from distance while its king will gradually get closer. That is why the king which is about to be checkmated must stay as far as possible from the opposing king (the queen can't checkmate it on its own).

You should also know that in this situation (king and queen against king) the checkmate will occur in at most 10 moves.

Checkmate with the queenThe white king must get closer to its counterpart; this is the fastest way the black king will be checkmated. the position at the begineing. Black will soon be in a checkmate position1. Kh1-g2 Kd5-d62. Kg2-f3 Kd6-e6 3. Qh8-d8 And now the queen has reduced the free space for the black king. 3... Ke6-f7
The free space for the black king is getting smaller and smaller due to the white queen. During this the white king is aproaching for the kill4. Kf3-f4 Kf7-e6 5. Kf4-e4 Ke6-f7 6.Ke4-f5 Kf7-g7 7. Qd8-d7+ Kg7-f8 8.Kf5-f6 Kf8-g8 9. Qd7-g7checkmate Checkmate! White wins this game
And the king was checkmated in less then 10 moves.

There are certain stalemate positions that may appear in this kind of endgames. You should know what to do when you run into tem. For example look at the chess board below.

Example of how you could get into a stalemate position if you are not carefoul

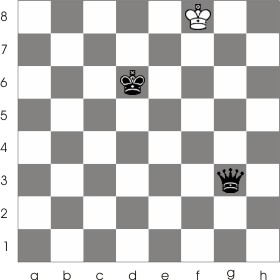
If Black were to move 1... Qg6, then he would provoke stalemate (the white king has nowhere to go). Wouldn't that be a shame.. if you are so close to victory and make a bad move like this...!The right move is : 1... Ke6 and now the white king is trapped in a zugzwang position : he has nowhere to go but 2. Ke8 Qg8
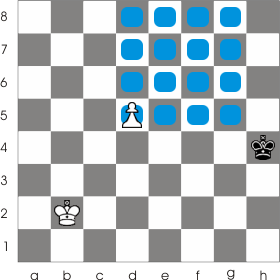
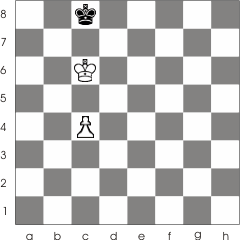
checkmate. Checkmate!


One rook checkmate

Just like in the case of checkmating with one queen, the rook needs the support of the king in order to checkmate the opponent. It uses the same principle : the rook reduces the enemy king free space while its king approaches it.

Look at the following example :

checkmate with one rookthe initial position of the kings and rook1. Kc2-d3 The only active move. There was no point in moving the rook. 1... Kf4-g4 The black king can't go past the 6th rank because the rook controls it. All it can do is to attack the rook in the hope that the opponent will make a mistake and live the rook in its place 2. Rh5-a5 Kg4-f4 3. Ra5-d5 3... Kf4-f3 4. Rd5-f5+White takes advantage of the fact that the two kings are in opposition and checks the king. Now the king loses another rank by 
The two kings are in opposition. After the White rook checks the king by moving to f5 Black will lose another rank4... Kf3-g3. As a general rule,you should know that in this kind of endgame the side which is about to checkmate will always try to gain opposition; this way he will be able to force the opponent's king towards the edge of the board by checking it. 5. Kd3-e3 Kg3-g4 6. Rf5-d5 And now the black king is forced to enter opposition 6... Kg4-g3 and of course White takes advantage : 7. Rd5-g5+Kg3-h3 8. Ke3-f3 Kh3-h2 9. Rg5-h5!? But what is this!? The black king is allowed to escape the h file! But wait there is more to this then meets the eye! 9... Kh2-g1 
 After White makes the waiting move Rh5-h8 Black is forced to enter the opposition where it will be checkmated10. Rh5-h8 (This is a waiting move. This kind of moves are made with no specific purpose other then that to wait for the opponent to make his move). White did this move because Black is in a zugzwang position, and now he is forced to make a bad move. 10... Kg1-f1 And now he entered in opposition 11. Rh8-h1checkmate Checkmate!Black is in a checkmate position. White wins the game


Two rooks checkmate

In the case of a king and two rooks against a king the stronger side is able to checkmate the opponent without the help of the king. But if the king steps in the checkmate could occur anywhere on the board.

When mating only with the rooks the king is leaded towards an edge of the board by the two rooks. Just take a look at the example.

checkmate with two rooksthe initial position of pieces on the chess board1... Ra2-a4+ 2. Kd4-e3 Rg5-g3+ 3. Ke3-f2 Rg3-b3 The rook is moved to a safe square. Black moves his rook to a square the white king can't reach at4. Kf2-e2 Ra4-a2+ 5. Ke2-e1 Rb3-b1checkmate Checkmate.Black wins by bringing the white king in a checkmate position

When mating with the king's support, we have a similar situation to that of mating with one rook. In this case one of the rook takes the place of a chess board edge( So the king can't pass the squares controlled by this rook). This way it could be checkmated even on the middle of the board.

checkmate with two bishopsThe black king will try to stay as close as possible to the barrier made by the two bishops. This way it will have the opportunity to escape the barrier if one of the bishops checks it. This is where the white king comes to the rescue, and helps the two bishops to reduce the Black's free space. the initial position of the pieces on the chess board1. Kg2-f3 Kd4-e5 2. Kf3-e3 Ke5-d5 3.Ba4-b3+ Kd5-e5 4. Bg5-e7 Now the black king can only go to the right.
the two white bishops have formed a barrier over which the black king can't go pass4... Ke5-f5 5. Be7-d6 Prevents the black king from going to the diagonal near the barrier. 5... Kf5-g5 6. Ke3-e4 Kg5-g4 7. Bb3-e6+ Kg4-g5 8.Bd6-e7+
the free space for the black king is getting even more smaller now that it has been checkedKg5-g6 9. Ke4-f4 Kg6-h6 10. Kf4-f5Kh6-g7 11. Kf5-g5 Kg7-h7 This is were most beginners tend to make a mistake. Most fail to find the solution and just end up either by losing a bishop or by stalemate. This is what you have to do : you reduce the black king's free space to only two squares and then your king moves in for the kill. Just like this : learn how to get closer to the king in order to checkmate it. This is the right way of moveing the White king without causing stalemate12. Be7-f8Kh7-h8 13. Kg5-f6 Kh8-h7 14. Kf6-f7 Kh7-h8 15. Bf8-g7+
This is the final position. You can see here how the black king was lead into a stalemate positionKh8-h7 16. Be6-f5checkmate Checkmate!

This were just a few simple checkmating patterns that may occur in endgames.

Now we are going to take a look at checkmating patterns that may occur somewhere else than the end game. This are quite often among beginners so by knowing them you will learn how to avoid them or how to apply them in your game.


Checkmating on the back rank

After a player castle, he gets his king into a safer location. Look at the following example.

The position of pieces on the chess board after castling

Both White and Black had performed the castling. But, if in this position, the king is attacked by a rook or the queen and the disadvantaged player has no possibility of capturing the attacking piece or has no possibility of interposing a piece between the king and that rook or queen, then checkmate results (because the king has no where to go). This type of checkmate is sometimes called back rank mate ,because it takes place on the back rank.

In the following example the white king is exposed to being checkmated on the back-rank with 1... Re7-e1. The black king is, however, quite safe because of the escape square at h7 ; so if White has its turn to move and tries 1. Rd3-d8 then the king can escape with 1... Kg8-h7.

In this example the white king is exposed to a chekmate on the backrank. The black king can only be checked on the backrank because it is able to escape at h7

In the following game Black is down a rook. But if you look more closer you can see that White is predisposed to being checkmated on the back rank: 1... Re7:e1 2. Rc1:e1 Qb4:e1 checkmate Checkmate!. And even if the Black had a rook less he won the game.

Black has two pieces that controll the e1 square. Thus after he captures the rook from e1 he can capture again at e1 and checkmate his opponent

In the next example the black king has the escape square at h7 but that square is under the control of the white bishop from d3. So after 1. Re1-e8 checkmate the king is checkmated.

The black king is about to be checkmated on the back-rank because he can't escape to h7 because this square is under the controll of the bishop from d3

The fact is that many tactics revolves around back rank mate. Many beginners often fall in this kind of traps. 
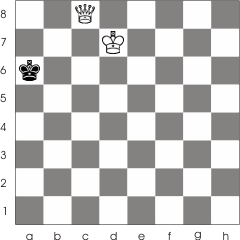
My advice to you is to pay attention when you run into this kind of positions. It's always a good idea to have an escape square where the king could move if attacked, or some other way to protect it.


This free website was made using Yola.

No HTML skills required. Build your website in minutes.

Go to www.yola.com and sign up today!

Make a free website with Yola